For the Lunar Festival, Khi from Tree Burglar challenge the blogging community and asks us to write some guide for new players. Here is mine !
"You're the Elder. Pretend you're smart for a few days =P"
So, you're a new healer. Or you finally want to have some tiny raid frames so you can dispel you fellow raid members. You've heard of Grid as a great raid addon, but you have also heard it was hard to set up. You're right, Grid is a great raid addon. It takes little place on your screen and let you know about anything you want to know, without giving to you useless information.
But you're also wrong. Grid can pretty well work out of the box, and I'll give you a short guide to make it usable.
Step 1 : Download Grid
If you've never used an addon before, you can download Grid on www.curse.com. But you'll get the latest version if you go directly to www.wowace.com.
Click on the "download" link, extract the file in the Interface\Addons folder in your World of Warcraft directory. (Depending on the setting you choose when installing WoW, it is generally in C:\Programs\World of Warcraft)
When you then log into wow, click on the "Addons" button at the bottom left of your screen and check Grid.
Step 2 : Getting started with Grid configuration menu


You have now grid running in your interface. You should have a new icon on your minimap, and perhaps one small and ugly square in the middle of your screen.
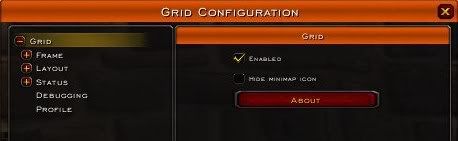
If you don't see the minimap icon, type /grid config, and uncheck "Hide minimap icon".
Now click on the minimap icon. A window opens with Grid configuration menu.The menu is divided in 3 part :
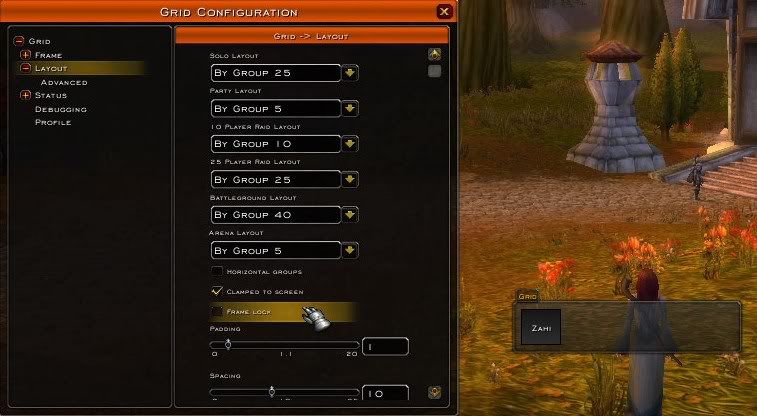
- Layout : Here you can choose how the little square are arranged. You can have different size of raids depending if you're in group, raid, battleground, etc., and you can choose to show pets, main tanks, have vertical or horizontal groups. You can also choose to hide Grid in some raid configurations by selecting "None".
- Frame : Here you can choose the appearance of the little squares. But, most importantly, this is where you'll choose how information you need are displayed in the square. In base grid, information can be displayed in different ways, called "indicators". It can be a colored dot in a corner, a colored border, the color of the square itself, a text information or a central icon. You can add more indicators by downloading pluggins.
- Status : Here you'll choose which information you want to see in grid.
To display any information in grid, you'll need to configure it in Status, and then to choose in which indicator it'll appear in Frame.
Step 3 : Setting Grid appearance
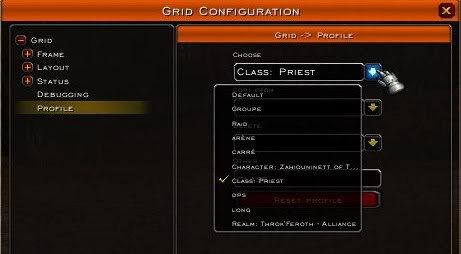
First of all, you want to choose a profile other than default, else your grid configuration could be erased when you update the addon. You do that in Profile.
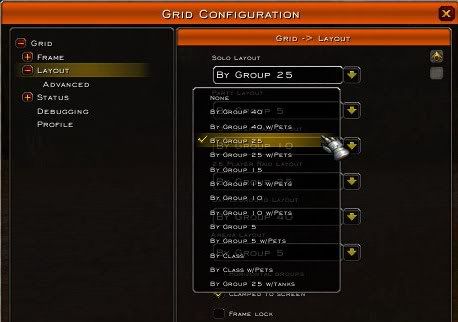
To configure Grid without having to be in a group, you need to choose a solo layout. You can do that in Layout/solo. To place Grid in your interface, you want to choose the greater layout you'll use most of the time. For me it is by group 25.
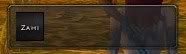
Now you should see one little square in a rectangular background.
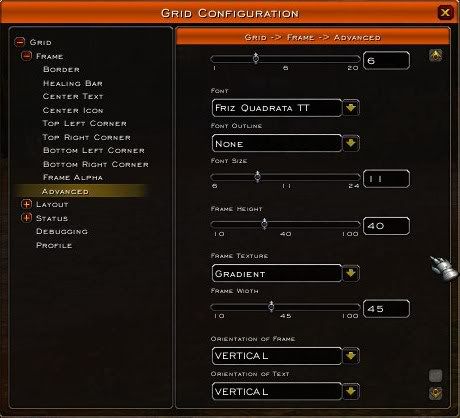
As the square is too small to be easily readable, you'll certainly want to change its size. This can be done in Frame/Advanced. You can change the scale of the square in Layout, or change it's form by changing its width and height in Frame/Advanced. In this menu you can also change texture, font, and the size of the indicators. You'll certainly want to change the corner size as the default one is very small.
Now, you can place Grid where you want on your screen by dragging the "Grid" tab. The background give you an idea of the place it'll take when you're in a raid. Make sure you uncheck "lock frame" (in Layout) to be able to move Grid. If the little Grid tab does not appear, check and uncheck "lock frame", it should appear.
You can also change the background appearance and the spacing between the squares in Layout and Layout/Advanced.
Step 4 : Displaying needed information
The default Grid configuration show most information you'll need :
- magic, disease, curse and poison are shown as blue, brown, purple and green dots of in top right corner and as a center icon (no screen, sorry but level 1 mobs don't put debuffs !)
- name is shown in center text if the target is at full health
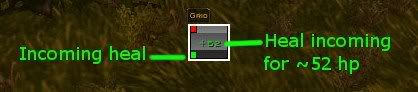
- Incoming heals are shown as a green dot in bottom left corner, on center text and as a visual heal bar.
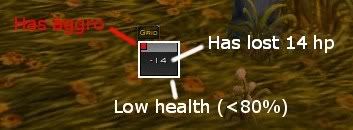
- aggro alert is shown as a red dot in top left corner
- health deficit is shown in center text if the target isn't at full health
- the border change color to show low health warning, low mana warning and your target.
- Frame alpha changed if target is out of range, dead or offline.
I still suggest doing a few change to this configuration :
- hide the debuffs YOU can't dispel on the center icon icon indicator. To do so go in Frame/Center icon, and uncheck the debuff types you don't need.
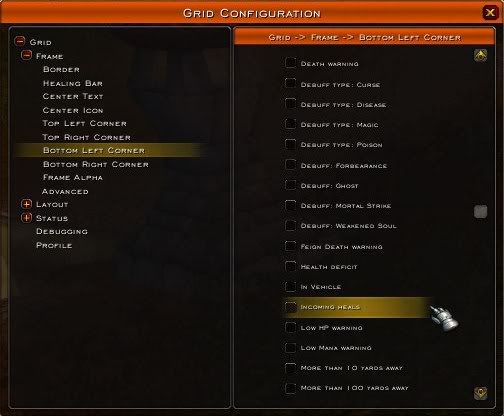
- The incoming heals alert show in 3 different indicator. I suggest you disable at least one of them. (I disabled the bottom left corner)
- The border change color to show low health and low mana warning. Personally, I find this information redundant / useless and I suggest you disable it. (You'll see if someone is at low health, you won't wait for the border to light up to heal !). It'll save you one great indicator to show more relevant information (for example, aggro alert). If you want to see an indication of mana, I suggest you download GridManaBar instead (see below).
In the default Grid configuration some specific class buffs and debuffs are already entered in Status/Auras, but they're not shown. These buffs are Lifebloom, Power Word:Shield, Regrowth, Rejuvenation, Renew, Riptide, Forbearance, Mortal Strike and Weakened Soul. To begin with, I suggest you enable only your own buffs and debuff, and to check the "Show if mine" option. Then choose the indicator you want and enable your buff. For example, I choose center icon for the Mortal Strike debuff, bottom-left corner for Renew and top left corner for Power Word:Shield and Weakened Soul.

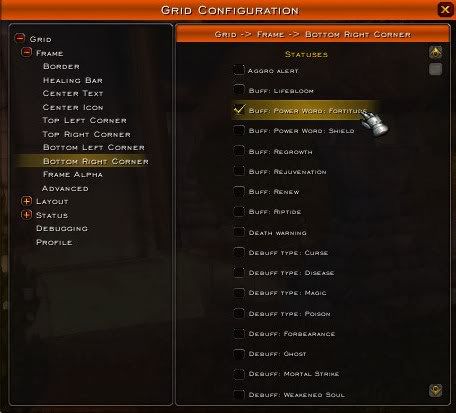
You can add more buffs and debuffs in Status/Auras by entering the exact name in the correct text area. You can use this functionnality to show missing buffs. For example, I want to see a wite dot in the bottom right corner if Power Word Fortitude is missing. To do that, I enter the buff name.

A new line "Buff : Power Word: Fortitude" appeared in Status/Auras. I choose the color, and check "Show if Missing".

Now I go to Frame/Bottom Right Corner and check "Buff: Power Word: Fortitude".
Step 5 : Having more from your Grid
Your Grid is now usable. But there are some additional change you'll certainly want to make before a long time :
- Showing raid debuffs : you'll certainly want some of the debuff raid bosses use to put on your raid to appear in you raid frames. That can be done in 2 ways. The simplest is to download GridStatusRaidDebuffs. You'll need to update it often to have new debuffs. That's why I suggest you to download it directly at wowace.com to have the newest version.
In Status/Raid debuff, you can choose which debuff you want to see (you don't want to see all debuffs, some are not useful and will just hide important information). You can also choose not to show dispellable debuffs (I suggest you choose this option, as the dispellable debuffs are already shown). By default, the raid debuffs are normally shown as a central icon. If not, go to Status/Central Icon and check raid debuffs.
If you don't want to download a new plugin, you can add each debuff manually. (It also works for any buff/debuff you want to see in Grid) - Setting different priorities allow you to see multiples status in the same indicator : for each grid status, you can choose a priority level. If differents status are displayed in the same indicator, only the status with the higher priority level will appear. For exemple, I chose to have Power Word: Shield and Weakened Soul in the same corner. I chose a priority level of 91 for PW:S and 90 for WS. Thus I see the WS debuff only when the PW:S is consumed.
- You'll certainly want to know how much time is left on your hots. You can have that by downloading GridStatusHots. If you're a priest, instead of selecting Renew in your renew indicator, you'll want to select My Renew. Then the color of the hot will change depending on how much time is left on it. You can choose the colors of the dot in Status/My hots/My Renew, as well as the moment you want the dot to change color.

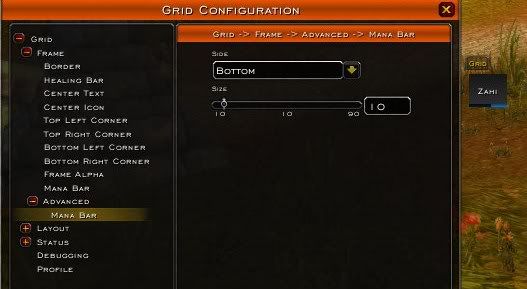
For example, as a shaman, you'll want the riptide dot to change color earlier than for other hots. I set it to change to color 2 at 4 seconds remaining and to change to color 3 at 2 seconds. When the dot is color 2, I know it is the perfect time to cast a Chain Heal on that target. When it change to color 3, I know I don't have the time anymore to cast a Chain Heal before Riptide wears off. - If you're a priest or a shaman, you'll want to see your group mana bars. You can download GridManaBar. This plugin can be easily configured in Frame/Advanced/Mana bar.
- There are 2 useful options to set up Grid on your screen:
In Layout, you can check (or uncheck) the option "Horizontal groups", depending if you want your groups displayed horizontally or vertically. In 25-men raids it won't make a huge difference, but in 5, 10 or 40-men raids you'll need to use this option to fit Grid in your UI.
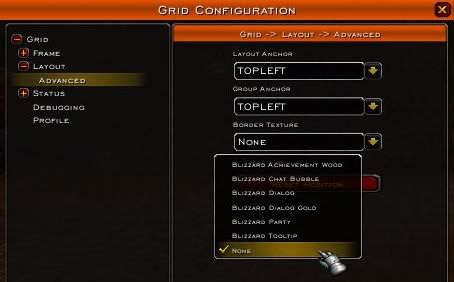
In Layout/Advanced, you can define an anchor for the unit frame. Selecting the good anchor will allow Grid to be exactly where you want, whatever raid setup you're in. For example, I chose the Top-left Anchor. Thus, the top-left square of Grid will always be at the same place, and the groups will grow to the bottom and to the right. - There are more options to change the look and feel of you frames. Default frame are empty at full health and fill up vertically. I find it great : you can better notice low health people and the vertical orientation allow me to have small frames thus I don't have to move my mouse a lot. But it can be confusing at first. You can change that in Frame/Advanced.
Frame orientation allow you to have your frames fill up horizontally, like most unit frames.
Invert frame color will allow you to have your frames full at full health, like most unit frames.
 |
| Bright pink dot : Riptide just applied |
 |
| Red dot : less than 2 seconds left on Riptide |
 |
| 4 to 2 seconds left on Riptide, time to cast Chain Heal on that target |
I think I summed up all you need to know about Grid to get started. Of course it won't be the awesome layout you can see on some UI, but you should be able to use Grid and improve your layout to make it fit your needs as you go along.
That is a very nice grid guide! Thank you!
ReplyDeleteGlad you liked it.
ReplyDeleteI noticed a lot of players seem to be kind of afraid of Grid configuration. I hope this guide can help them.
Fantastic guide. I know a number of my guildies who should give it a read.
ReplyDeleteSent this to a friend who's just downloaded Grid last night, thanks! I found out some things I didn't know...
ReplyDeleteHave you ever try Vuhdo? It is amazing, and maybe I'm kinda idiot but I prefer a lil tiny icon in my bar then a simple square with no further indications.
ReplyDeleteI tried Vuhdo but didn't like it. I just couldn't do what I wanted with it. I find simple squares are great as it only show useful information.
ReplyDeleteBut I use icons in Grid too, when it is needed (to see how many charges are left on my earth shield for example). I just didn't spoke about it as it is advanced grid configuration, and could just confuse new users imo.
I'll probably make another blog post about my grid configuration in the next weeks.
Thanks for the guide, I downloaded Grid just last night so I could try it out.
ReplyDeleteIts my destiny to visit at this blog and find out my required paragraph along with video demo, that’s YouTube video and its also in quality.
ReplyDeleteDog boarding Spring Houston
cheap jordans
ReplyDeleteyeezy boost 350
lebron james shoes
true religion jeans
nike air zoom structure 19
yeezy boost 350
timberland shoes
fitflops sale clearance
stephen curry shoes
20 public general, science and technology university is published the guccho university admission result
ReplyDeleteonline on gstadmission.ac.bd. Students will need ssc and hsc roll number, board, passing year information to check the result.
DSHE is published the All Subject Class 10 Assignment Answer 2022 for all week on assignment.examresulthub.com.
ReplyDeleteWant to check the all assignment work and answer, make sure to follow the below subjectwise links:
DSHE is published the SSC Assignment Answer 2021 for Class 10 for three weeks. lets check the assignment work with answer.
Every week different types of job notifications bring Weekly Chakrir Khobor Newspaper. Every week's job circular has been published for jobless people. Our website all details - jobnewsbd24.com
ReplyDeletereplica bags paypal accepted look at these guys q0a71w8m12 replica bags canada replica bags and shoes replica gucci d4p34f0m99 replica bags chicago check over here t2a34i6b01 buy replica bags online replica bags a9o75e7h46
ReplyDeletecurry shoes
ReplyDeletesteph curry shoes
supreme clothing
curry 6
moncler
golden goose
golden goose sale
kyrie irving shoes
c7y78w8j59 p8n26k9t34 m2j59f9y03 o0m79w8n42 i6p72y0l41 c2l05g9x85
ReplyDeleteamasya
ReplyDeletekaraman
bitlis
niğde
kars
7OS0AD